Inventory Control Sheet
Point of Service > Inventory Control Sheet
The inventory control sheet is used to track the quantity of a Sales Item at the beginning of service and at the end of service. The difference is compared to the quantity sold at the POS.
Note: The Inventory Control Sheet is NOT connected to the inventory module.

-
All Cafeterias - filter by cafeteria
-
All Serving Sessions - filter by serving session
-
All Statuses - filter by status (All Statuses (default), Initial Post, Open, Posted)
-
Reset - click to reset search parameters
-
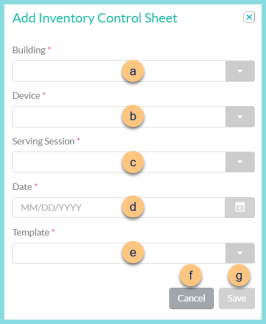
Add New Inventory Control Sheet - click to add a new control sheet
-
Building - select cafeteria
-
Device - select device
-
Serving Session - select serving session
-
Date - select date
-
Template - select template
-
Cancel - click to return to the previous screen without creating a new control sheet
-
Save - click to save changes
-
Date - click to sort by date
-
Cafeteria - click to sort by cafeteria
-
Serving Session - click to sort by serving session
-
Device - click to sort by device
-
Status - click to sort by status
-
Pencil - click to be redirected to the individual inventory control sheet
-
Calendar Icon - hover to the activity log
-
< > - click to scroll through pages
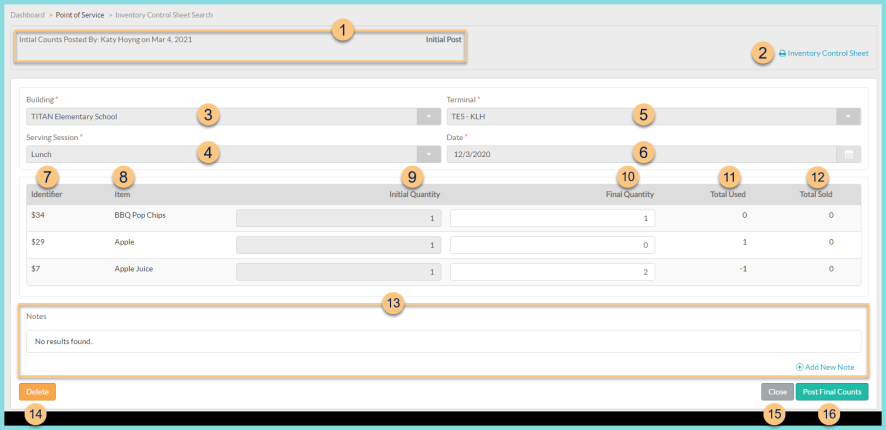
Individual Inventory Control Sheet
-
Notice the Initial Counts Posted By and Date. Notice the Final Counts Posted By and Date. Notice the Status.
-
Building - change the cafeteria if needed
-
Serving Session - change the serving session if needed
-
Terminal - change the device if needed
-
Date - change the date if needed
-
Identifier - notice the sales item identifier
-
Name - notice the sales item name
-
Initial Quantity - enter the starting quantity of the item
-
Final Quantity - enter the final quantity of the item
-
Total Used = Initial Quantity - Final Quantity
-
Total Sold = quantity sold at POS
-
Notes - notice any internal notes and click (+) Add New Note to add additional notes. Notes are not editable.
-
Delete - click to delete the control sheet
-
Close - click to close the control sheet and return to the previous screen
-
Save - click to save the control sheet and return to work on it later
-
Post Initial Counts (not pictured) - click to post initial counts
Post Final Counts - click to post final counts